Introduction
Updated: January 2025
Dialing in espresso can be one of the most challenging parts of brewing espresso, but we are here to help!
If you are just starting with espresso, return to this article in a few weeks after you get the hang of things. If you are at the beginning of your espresso brewing journey, we recommend reading the three articles below.
19 tips on how to make better espresso at home
How to brew better espresso (this is quite an in-depth read)
If you read the above articles, you should now have a basis for proper dosing and using the correct basket size, which is where many early espresso enthusiasts struggle. If you have already dialed in coffee before and successfully, this article will give you a bit of a head start on your next bag of espresso beans.
Coffee Subscription Deal
Subscribe to Coffee Bros. coffee for 25% off when using code "FTSUB25" at checkout
Grind by Weight versus Grind by Time Espresso Grinders
First, we’ll need a general understanding of the different espresso grinders on the market. You’ll be dealing with one of the following: The “Grind by time,” which is the most used at-home espresso grinder, is the one we’ll focus on to help improve your dialing-in process.
Grind-by-Weight GbW grinders: Grind-by-weight grinders do precisely what you think they might. You set the desired weight in grams, hit the grind button, and a few seconds later, you have close or exactly how much ground coffee you need in your portafilter. Most high-end commercial grinders like the Mahlkonig E65S GbW have this feature, but it can also be found in the Baratza Sette 270Wi, powered by acaia technology.
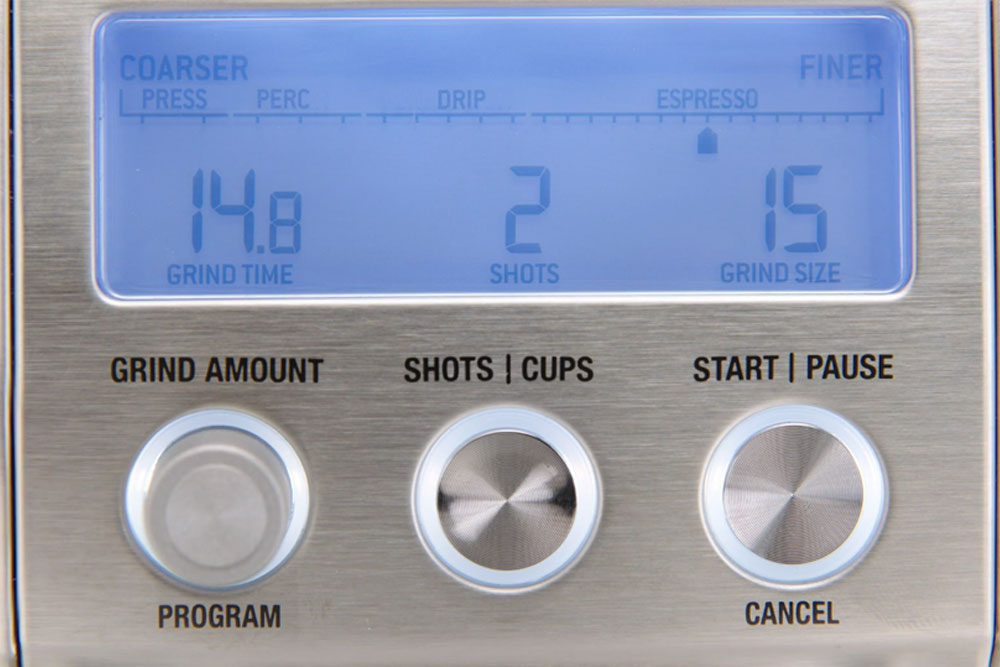
Grind-by-Time GbT grinders: Grind-by-time grinders are what you’ll find most on the market and do a decent job of achieving your desired weight, but they can sometimes be frustrating. Grind-by-weight grinders work by setting the amount of time you want to grind.
Grind-by-time grinders that do not display the actual time and have a dial with an estimated time will not work as well with this method, as exact timing is key to better dialing in your coffees. A small trick that may work is marking the machine to understand better when turning the dial to the “x” position, which would equal “y” time.
Grind-by-weight
Grind-by-time
Coffee Bean Density by Roast Level
The next concept worth understanding is the density of coffee at different roast levels. You may have noticed in your coffee purchases that darker-roasted coffees have bags that appear fuller than their lighter-roasted counterparts.
This is because darker-roasted coffees lose density and expand more during roasting. You end up with slightly larger coffee beans, which tend to weigh less than a lighter-roasted coffee of the same variety/processing method.
Link to full publication on Coffee Density
This is an important concept to understand and one you may have encountered when dialing in coffees. You may have had a lighter-roasted coffee in your hopper (which tends to need a finer grind), and then switching to a darker-roasted coffee will likely result in a very slow or clogged shot on your first attempt if you didn’t adjust your coarseness.
Espresso Brew Ratios
The final concept worth understanding, and most novice to experienced espresso enthusiasts will have a grasp of this, is espresso brew ratios or recipes.
Espresso brew ratios are the amount of coffee grounds used versus the final extraction yield or liquid in your cup.
For example, a normale espresso (some may call this a double) calls for a 1:2 ratio, meaning that for every 1 gram of ground coffee in your espresso portafilter, you aim for 2 grams of espresso yield in your cup. A standard double espresso recipe may call for 18 grams of finely ground coffee in your portafilter, yielding 36 grams of espresso in your cup and typically within 30 – 35 seconds.
Most will stick to a standard 1:2 ratio in the 30 – 35-second range. I tend to brew some of our coffees at a slightly longer range, using 20 grams of coffee and maybe extracting 40-45 grams of liquid in closer to 40 seconds. This is possible without causing unwanted bitterness due to how my espresso machine brews, with its ability to lower pressure slowly over time and not using a standard 9-bar shot (more on that at another time).
Recommended Reading: See our Espresso Drink Calculator to learn more about receipes
How to Quickly Dial-In Any Espresso: The Cheat Code
If you read up to this point, you now understand the differences between espresso grinder types (grind-by-time grinders are needed for this tip), roast level density differences, and the details around espresso brew ratios.
This tip works great for those sticking to a given recipe, regardless of roast type, and those who brew relatively the same often.
This can undoubtedly work across many brew ratios, but it is just another factor to remember moving forward.
For this exercise, let’s assume you use a 1:2 ratio and have successfully dialed a coffee to your desired recipe.
You have:
Medium Roast Coffee: You successfully dialed in a medium-roasted coffee. We like to use a Medium Roast as a benchmark, as getting this correct make dialing in Dark and light-roasted coffees much easier.
Chosen Recipe: You have a chosen recipe, such as a 1:2, and use essentially the same amount of coffee each time (let’s say 20g of espresso)
Grind-by-Time Grinder: Your espresso grinder is a grind-by-time grinder that displays the time in seconds
Please use the below factors lightly, as they are tied to my Eureka Atom 75 grinder using the Coffee Bros. Espresso Roast.
Using my preferred recipe, an Eureka Atom 75, and medium-roasted coffee, the grind time that optimally produces my ideal espresso at 20 grams in and 40 grams out takes roughly 3.45 seconds. From here, I only scale up and down grind size, and I never touch timing.
The Tip: Only change the single element of grind size
Once you understand the time it takes your grinder to ideally produce a perfect shot of (example: 20 grams in and 40 grams out in 35 seconds) to repeat that given recipe across roast levels means you change the grind size (and never time) until you hit 20 grams out in the portafilter. Knowing that a specific time produces your ideal shot of a medium roast, scale down the setting to finer when you have a light roast so that 20 grams come out in 3.45 seconds, and do the opposite for a dark roast. The tip is to hit your 20-gram ground into your portafilter in 3.45 seconds regardless of the roast type, and you achieve this by only going finer or coarser and never touching time.
The Chart Displays: Maintaining a consistent grind time while adjusting grind size to match roast density for optimal espresso extraction
The Tip in Detail
Since I know our coffees well, it is easy to see the development levels so I can dial in them quickly. If you use one medium roast from one roaster and then grab another, which happens to be a lighter roasted medium coffee (visuals after grinding and not the exterior), it will likely mean you need to grind finer.
Know the time it takes to produce the perfect shot of a medium roast. The Eureka Atom 75 produces my ideal shot recipe of 20 grams in and 40 grams out in 3.45 seconds of grind time.
When switching coffees, do not touch your time settings. As mentioned above, if you want to brew the same recipe with a different coffee, either darker or lighter, do not touch your time setting; only adjust the grind to be coarser or finer.
Lighter coffee: If you just had the perfect setting for a medium roast coffee and switched to a light roasted coffee, the same 3.45 seconds without changing anything else will give you more grounds in your portafilter. Since lighter coffee is denser, you should immediately know that you must start at a much finer grind setting.
Darker coffee: If you just had the perfect setting for a medium roast coffee and switched to a dark roasted coffee, the same 3.45 seconds without changing anything else will give you fewer grounds in your portafilter.
Where espresso brewers get lost is changing too many elements when brewing a similar recipe across roast levels.
Dialing-in from a Medium Roast to Light Roast Coffee
When going from a Medium Roast to a Lighter-Roasted Coffee
If I had just perfectly ground and brewed a medium-roasted coffee and then switched to a lighter roasted coffee in my hopper, I would expect, without changing any settings, 10 – 20% more grounds in my portafilter than the medium-roasted coffee.
Temptation #1: The temptation here is to remove the excess coffee, tamp, and brew, but your coffee will come out way too quickly. We already know that 3.45 seconds should produce the perfect shot of a medium roast at 20 grams into the portafilter.
Temptation #2: Given that you are using a grind-by-time grinder and you just ground 20% more coffee than intended with your new coffee, the temptation would be to reduce the time only to get 20 grams into your portafilter. This temptation will simply give you 20 grams of coffee, but you will still brew an extremely fast shot.
If we know 3.45 seconds is the perfect time for your hypothetical grinder and recipe, then do not adjust the time; only adjust the grind size. A finer grind size in the same amount of time will produce less coffee!
In the above scenario (going from a medium coffee to a lighter coffee), all you need to do is adjust your grind setting much finer until you hit 20 grams of ground espresso in your portafilter in the same 3.45 seconds, which gives you the great shot of a medium roast.
Final Thoughts
The above should work exceptionally well at immediately reaching a reasonable range. If I know 3.45 seconds and a grind setting of 4.5 gets me a great espresso and a medium roast, scaling my grind setting up or down based on roast type but not touching time will help me dial in coffees much quicker.
There are a few big caveats to this, which comes down to the recipe and the age of your coffee. If you are switching from normal to lungo shots, you need to have a good lungo recipe and setting as your base before making any adjustments. Different recipes mean different starting parameters. An older coffee will require different adjustment than a freshly roasted coffee so keep that in mind as well!


